Tag Archives: print speed

Elegoo OrangeStorm Giga: Redefining Large-Scale 3D Printing

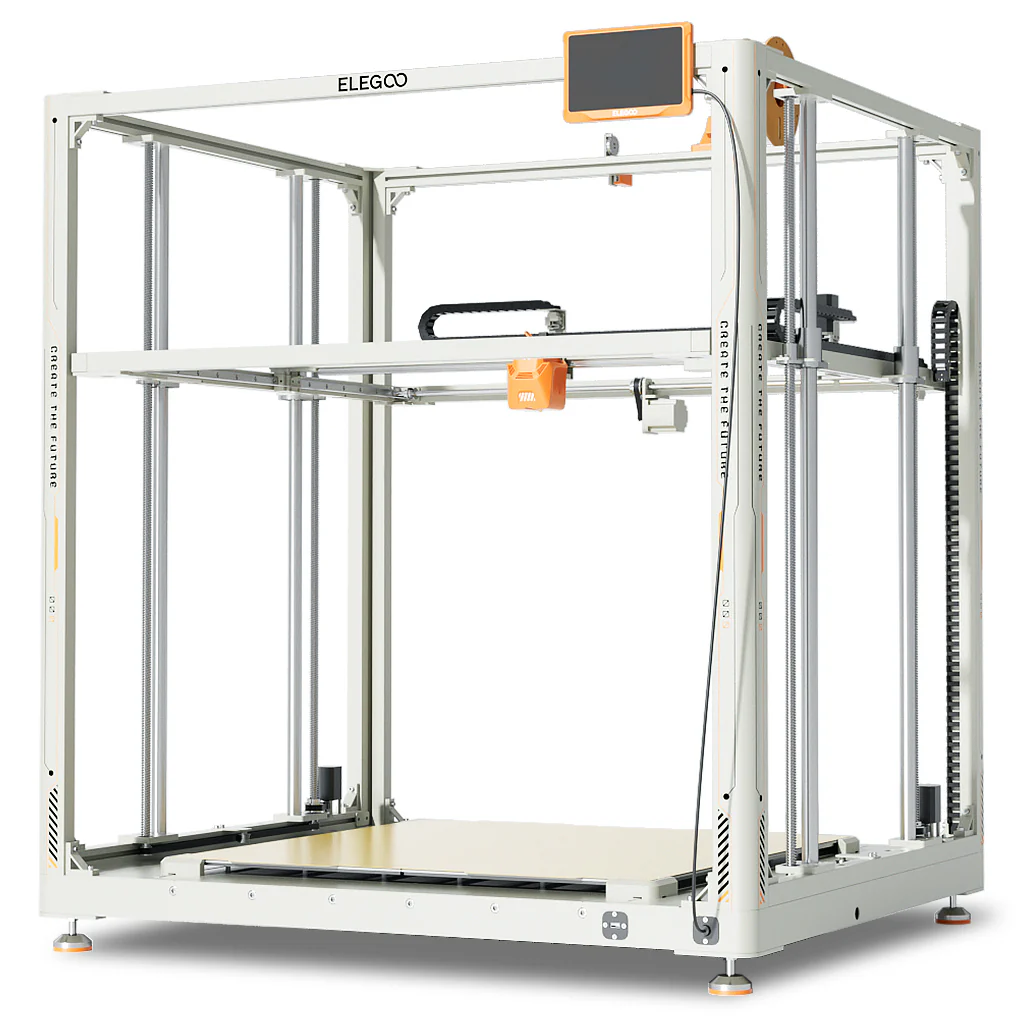
In the world of 3D printing, where innovation drives progress, Elegoo has unveiled a machine set to redefine the industry: the Elegoo OrangeStorm Giga. This isn’t just another addition to the market—it’s a significant step forward in 3D printing technology, poised to open new creative and industrial opportunities. If you’re ready to see what the future holds, let’s dive into why the OrangeStorm Giga is making waves.

Elegoo OrangeStorm Giga: Redefining Large-Scale 3D Printing

Gigantic Build Volume – A New World of Possibilities

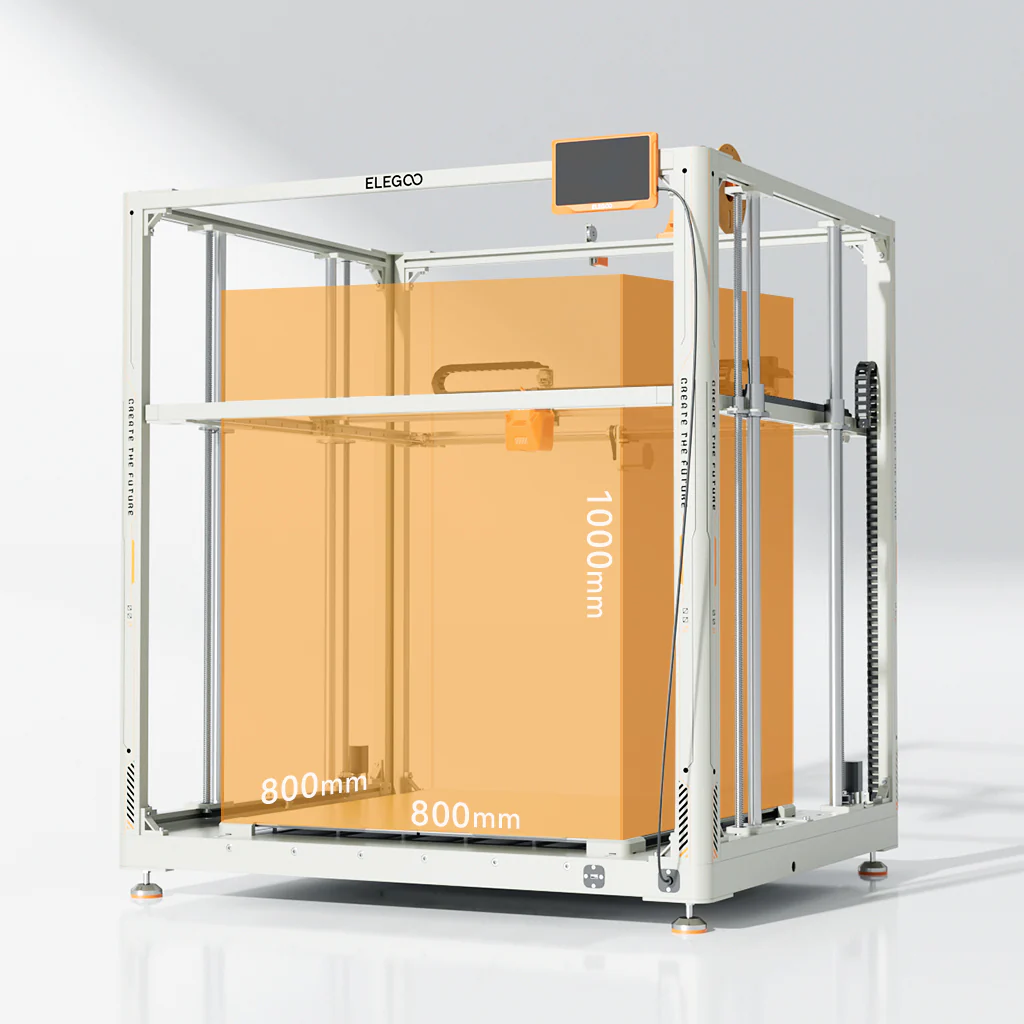
At first glance, the most impressive feature of the OrangeStorm Giga is its massive build volume: 800mm x 800mm x 1000mm. But this isn’t just a size upgrade; it’s a game-changer.

For industrial designers, prototyping specialists, and ambitious hobbyists, the ability to print large, seamless models without splitting them into segments saves time and improves structural integrity. Whether you’re producing industrial parts or massive artistic pieces, this functionality transforms what you can achieve.

To truly appreciate the size of this printer, Elegoo has included a video or 3D model mockup of the Giga, showcasing its full potential.

Elegoo OrangeStorm Giga: Redefining Large-Scale 3D Printing

Intelligent and Efficient Heated Bed

Speed and precision are crucial in 3D printing, but efficiency is just as important—and the OrangeStorm Giga nails this balance with its intelligent heated bed system.

The heated bed consists of four independent 410mm x 410mm PEI magnetic high-temperature platforms. These platforms can heat simultaneously to 90°C in just 17 minutes (with an ambient temperature of 25°C), ensuring fast and even heating.

What sets it apart is its ability to automatically recognize and heat only the area beneath the model for increased energy efficiency. Alternatively, users can manually control the heating zones for even more customization.

Elegoo OrangeStorm Giga: Redefining Large-Scale 3D Printing

Fast Printing with High Performance

The Elegoo OrangeStorm Giga isn’t just big—it’s fast. Thanks to its 64-bit 1.5G clock speed quad-core processor (SOC RK3328), this printer delivers print speeds up to 300mm/s (with 150mm/s recommended).

Compared to standard large-format printers, this speed is six times faster. For those working on large projects, faster prints mean quicker iterations, helping you meet deadlines and get creative ideas into production faster than ever before.

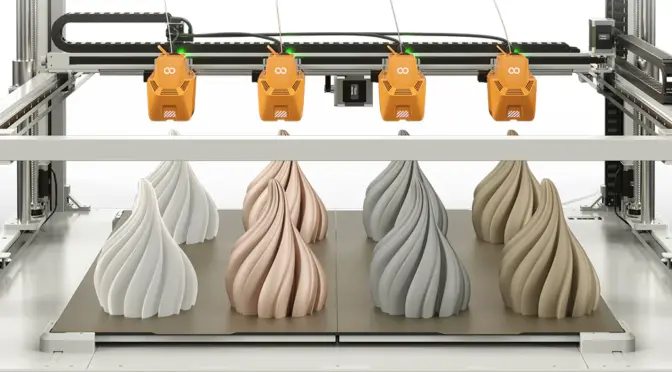
Multi-Nozzle Printing for Versatility

One of the standout features of the OrangeStorm Giga is its multi-nozzle printing capability. It supports up to four nozzles on the X-axis, allowing simultaneous printing of four identical models or models in different colours.

This isn’t just about speed and productivity; it’s also about versatility. Multi-nozzle printing enables complex, multi-material designs and offers enormous potential for prototyping and creative experimentation.

Superior Cooling System for Optimal Results

Elegoo has also paid close attention to cooling, which is critical for print quality and machine longevity. The printer is equipped with thicker dual-sided cooling fans designed to keep prints sharp and precise.

Its intelligent control system automatically turns off the fans once printing is complete, reducing noise, saving energy, and extending the life of the hardware—a thoughtful addition for both home users and industrial environments.

Upgraded Nozzle for Precision and Efficiency

The 300°C high-temperature nozzle features a proximal double-gear extrusion structure and a full titanium alloy heat pipe. With a chrome zirconium copper nozzle and a 60W ceramic heating pad, it ensures smoother and more uniform extrusion for improved printing precision.

Additionally, the nozzle includes PID auto-calibration for precise temperature control and a built-in acceleration sensor for resonance compensation, enhancing overall print quality. The standard nozzle diameter is 0.6mm, with optional sizes ranging from 0.4mm to 1mm.

Auto-Leveling for Hassle-Free Setup

Leveling the bed can be a challenge for many users, but the OrangeStorm Giga simplifies this with an automatic leveling system. This ensures accurate prints without the frustration of manual adjustments.

High-Quality Craftsmanship

The OrangeStorm Giga’s design combines durability and elegance. Its integrated body, linear guides on the X and Y axes, and an upgraded Z-axis rod improve stability and extend the machine’s lifespan. The carbon steel round base and rubber anti-slip pads add to the overall robust construction.

Powerful Features for a User-Friendly Experience

  • Caterpillar Cable Tracks for smooth and organized cabling.
  • Filament Detection & Power Loss Recovery to ensure uninterrupted printing.
  • Portable 7-inch HD Capacitive Screen for intuitive operation.
  • User-Friendly Belt Knobs for easy adjustments.
  • Large Spool Holder for handling larger filament spools up to 5kg.

What’s in the Box?

  • OrangeStorm Giga 3D Printer
  • Printhead
  • 7-inch HD Screen
  • Leveling Plates (x2)
  • Spool Holder Arm and Assembly
  • Filament Breakage Detectors (x2)
  • Z-axis Cable Track Clips and End Stops
  • Filament Guide Assembly
  • Power Cable
  • Leveling Card
  • Grease
  • Profile Corner Brackets (x8)
  • Tools and Fasteners
  • User Manual

Technical Specifications

  • Printing Technology: FDM (Fused Deposition Modeling)
  • Build Volume: 800 x 800 x 1000 mm³
  • Max. Nozzle Temperature: 300°C
  • Max. Hot Bed Temperature: 100°C
  • Print Speed: Max 300mm/s (Recommended 150mm/s)
  • Filament Compatibility: PLA, PETG, TPU
  • File Transfer: USB, LAN, WiFi
  • Languages Supported: English, French, German, Russian, Italian, Spanish, Japanese, Chinese
  • Machine Size: 1224 x 1164 x 1425 mm³
  • Weight: 104kg (Net), 145kg (Gross)
  • Power Supply: 100-120V / 220-240V

In Summary

The Elegoo OrangeStorm Giga is more than just a large 3D printer; it’s a beacon of innovation for the entire industry. Its massive build volume, intelligent heating system, blazing-fast speed, multi-nozzle capabilities, and superior cooling design make it a printer that stands apart from the competition.

Whether you’re an industrial user seeking faster prototyping or a maker with a passion for pushing creative boundaries, the OrangeStorm Giga is the tool you’ve been waiting for.

The Elegoo OrangeStorm Giga is available for pre-order now

From Manual Filament Swapping to Automatic Colour Changes: Ender 3 vs Anycubic Kobra S1 Combo

From Manual Filament Swapping to Automatic Colour Changes: Ender 3 vs Anycubic Kobra S1 Combo

As someone who’s had the opportunity to tinker with various 3D printers over the years, I’ve experienced both the joys and frustrations of colour swapping during prints. My journey started with manual filament swaps on the Ender 3, and now I’ve moved on to the seamless (albeit not waste-free) world of automatic colour swapping on the Anycubic Kobra S1 Combo. Let’s dive into the key differences between these two approaches and the lessons I’ve learned along the way.


Manual Filament Swapping on the Ender 3

The Ender 3 is a fantastic workhorse for beginners and enthusiasts alike. However, when it comes to multi-colour printing, you’re limited to manual filament swaps, which can only be done at specific layer heights. While this technique is simple in concept, it comes with its own set of challenges:

How It Works

  1. Design the model with clear layer divisions for each colour.
  2. Use your slicer software (e.g., Cura) to insert filament change commands (commonly M600 G-code) at the desired layer height.
  3. Monitor the printer closely and manually swap the filament when prompted.
  4. Restart the print after the filament is loaded.

Advantages

  • Cost-Effective: No need for additional hardware or upgrades.
  • Straightforward: Simple to set up with basic slicer adjustments.
  • Customisation: Allows for precise colour placement, as long as changes align with flat layers.

Challenges

  • Time-Consuming: You must stay near the printer to swap filament, especially for prints with multiple transitions.
  • Limited to Layers: Colour changes are restricted to flat transitions between layers, making it unsuitable for gradient or complex designs.
  • Risk of Errors: Improper filament loading or extrusion can result in print failures or layer inconsistencies.

The Ender 3 is a simple “bed slinger” design, where the print bed moves along the Y-axis during printing. This makes it easy to understand and maintain but limits its speed and precision compared to more advanced designs. Manual filament swaps on the Ender 3 are a rewarding challenge, but they’re not ideal for prints requiring frequent or intricate colour changes.


Automatic Colour Swapping on the Anycubic Kobra S1 Combo

Enter the Anycubic Kobra S1 Combo, a machine that takes the hassle out of colour transitions with its automatic colour swapping capabilities. This feature is a game-changer for multi-colour printing, but it’s not without its quirks.

How It Works

  1. Load multiple filaments into the system’s multi-material module.
  2. Use your slicer software to assign colours or materials to specific parts of the model.
  3. The printer automatically purges and swaps filaments as required during the print.

Advantages

  • Full Automation: No need to monitor the printer for manual swaps.
  • Flexible Design: Supports intricate, multi-colour models and even gradient effects.
  • Time-Saving: Once the print starts, you can walk away and let the machine handle transitions.
  • Advanced Features: Comes with a four-reel filament holder, filament drying capabilities (ACE Pro), and a completely enclosed design with a self-levelling bed for precision and consistency.
  • Core-X-Y Design: The Kobra S1 uses a core-X-Y motion system, where the print head moves along the X and Y axes, while the bed remains stationary in those directions and only moves along the Z-axis. This design allows for faster and more precise printing.
  • Speed: Prints significantly quicker than the Ender 3, reducing overall production time.

Challenges

  • Purge Waste: Automatic colour swaps generate significant purge waste, especially for frequent transitions. This waste can be a mix of materials and colours, making it harder to recycle.
  • Material Costs: Increased waste also means higher filament consumption, which can add up over time.
  • Complexity: The Kobra S1 Combo’s advanced features and capabilities make it a more complex machine to operate and maintain, compared to the hands-on simplicity of the Ender 3.
  • Calibration Required: Achieving perfect transitions may require fine-tuning slicer settings and calibration.

Despite these challenges, the Kobra S1 Combo excels at delivering high-quality multi-colour prints with minimal effort compared to manual methods.


Key Comparisons

Feature Ender 3 (Manual Swaps) Anycubic Kobra S1 Combo (Automatic)
Ease of Use Labour-intensive Fully automated
Print Complexity Limited to layer changes Supports gradients and intricate designs
Material Waste Minimal Significant purge waste
Time Investment High (requires supervision) Low (set and forget)
Cost Efficiency More cost-effective Higher filament consumption
Learning Curve Simple to learn Requires slicer and printer calibration
Features Basic setup Four-reel holder, filament dryer, enclosed design, self-levelling bed, Core-X-Y system
Speed Slower print times Significantly faster

Which System Is Right for You?

The choice between manual and automatic filament swapping depends largely on your needs:

Creality Ender 3
Creality Ender 3

Ender 3: Ideal for budget-conscious users who don’t mind putting in extra effort to achieve basic multi-colour prints. It’s a hands-on machine that’s perfect for learning and tinkering.

Anycubic Kobra S1 Combo

Anycubic Kobra S1 Combo: Perfect for users looking for convenience and the ability to create complex, high-quality multi-colour designs with minimal manual intervention. Its advanced features make it a powerful tool but with added complexity.

For me, moving to the Kobra S1 Combo has been a revelation. The convenience of automatic colour swapping far outweighs the challenges of purge waste and calibration. That said, the Ender 3 taught me valuable skills and patience, which I still draw upon when troubleshooting more advanced systems.


Final Thoughts

Transitioning from manual to automatic colour swapping is like moving from a bicycle to a car—both get you to your destination, but the experience is vastly different. The Ender 3 is a great starting point for learning the fundamentals of 3D printing, while the Anycubic Kobra S1 Combo opens up a world of possibilities for complex, multi-colour creations.

If you’ve been hesitant to make the leap to automatic systems, consider this: while there’s no substitute for learning the basics, automation can free up your time to focus on what really matters—creating amazing prints.

What’s your experience with colour swapping in 3D printing? I’d love to hear your thoughts in the comments below!

If you are thinking of buying a Anycubic printer, use the discount code MATTPORTER when you check out to receive a £20 discount.